How Not to Lose Hive Tools

These are some of my hive tools splattered - yes, I used that word deliberately - with blue paint.

These are some of my hive tools splattered - yes, I used that word deliberately - with blue paint.

How Not to Lose Hive Tools

Maybe this is not the best title for this column, maybe I should call this one of the many things one can do to not lose one's hive tools but it was the latest of many steps I have taken over the years, and the one that seems to have worked the best. So far.

As a beekeeper, one should not only have several hive tools but one should have a way to easily retrieve them, especially out of another beekeeper's tool bucket. Or car. Or bee jacket!

Not that my beekeeping buddies would ever deliberately abscond with one of my hive tools but this year it sure seemed like I would get home from a bee yard hive inspection and find myself light of a hive tool, or two. Then the discussion would center around which of the extra hive tools belonged to whom, they all looked alike.

A little blue paint and I fixed that discussion, I literally splattered blue latex paint over my hive tools to mark them as mine. It was from an old blue spray bottle leftover from another project so I didn't even go out of my way to buy the paint.

My biggest challenge was trying to figure out how to hang them so that both sides could dry.

Screw drivers under something heavy make good temporary hangars for drying hive tools.

Screw drivers under something heavy make good temporary hangars for drying hive tools.

Using another indispensable beekeeping tool, at least in my apiary, screwdrivers, I piled a heavy plastic tote on the screwdrivers and the hive tools could easily hang to dry.

Now when they end up in the wrong bucket at the end of a hive inspection, at least everyone knows whose hive tools they have to return!

What do you do to mark your hive tools - or do you?

Charlotte

Honey Contest Ribbons

These honey contest ribbons were inspired by some I have seen at quilt shows.

These honey contest ribbons were inspired by some I have seen at quilt shows.

Honey Contest Ribbons

Have you tried to find award ribbons? I was looking for some recently and couldn't even find the standard satin ribbons with 1st, 2nd and 3rd place on them. One of the local businesses said they were special order and could take several weeks. Someone must have a ton of them locally, I used to see them all over the place at local service clubs and summer fair contests.

To be honest, those traditional ribbons probably would not cut it even if I could find them. When it comes to honey, it's mighty precious and deserving of much more.

As I was mulling over what to do for our annual honey tasting contest, I remembered the variety of flower ribbons I have seen over the years at quilt shows. There were the lovely all felt ones that looked like dahlias, then the fleece ones rolled into rose buds. 

Taking a cue from quilting, I took some complimentary cotton remnants and made these floral ribbons. A little green felt leaf helps to add the floral quality to the fabric circles and the yellow buttons suggest the pollen bees collect to make the honey.

When I make these again, I will replace the yellow satin ribbon with gross grain ribbon, it holds up better than flimsy satin but I couldn't find any locally.

The honey tasting contest is one of our favorite yearly events, more fun than competition but I like the idea of these flowers to celebrate the collective favorite honey. I think my bees would approve!

Charlotte

How to Find Store Beekeeping Section

A sure sign of the store beekeeping section, bees flying overhead!

A sure sign of the store beekeeping section, bees flying overhead!

How to Find the Beekeeping Store Section

Busy, busy, busy this year, so busy that I barely glance around stores as I pop in. Our local hardware stores have picked up on the beekeeping interest but sometimes I have to check all of them before I find what I need. 

On this particular day, I had just heard the first winter 2018 forecast on the radio. I never quite know whether the bellybutton of Missouri falls into the northern plains or the east coast, especially when they don't even mention a state remotely close. I hope we have a little bit of a break, or more of a break than we had last year, I thought as I popped into yet another hardware store.

It's honey harvesting time, and a friend had told me there were some plastic bear jars locally in stock. Not a particular fan of those containers, I was going to give them another look before I decided if I would use them this year if I could remember what store he had said he found them.

 It's a personal thing. My bees work SO hard to make honey, I like to package their hard work in a way that honors the gift they give us. Actually we take it from them when they make extra but I digress.

So this particular hardware store had recently changed hands, and inventory. They were also transitioning from summer to Christmas so my usual aisle haunts were gone. Sad but true, I was lost.

Around one of the corners, a lady was stocking shelves so I decided to ask for help. Did she happen to know how I could find the beekeeping supplies?

She gave me a smile and pointed towards the ceiling. Several stuffed bees were hanging around a mannequin in a bee suit. Not quite a swarm but definitely a good clue!

Charlotte

Why Honey Frames Should Be Frozen Before Storing

This was the last honey frame in the bottom box from a pile of six, 10 frame boxes.

This was the last honey frame in the bottom box from a pile of six, 10 frame boxes.

Why Honey Frames Should Be Frozen Before Storing

It's always tempting to say it won't happen to me, or I don't see them, or not to concentrate on the warnings I pass on at our bee club meetings. See, I know some of you are snoozing when I talk about it but here's why I say honey frames should be frozen before storing.

I had six boxes of honey frames stacked in my cold basement utility room as I cycled the frames through my tiny freezer before storing them in plastic totes. The honey frames were beautiful, all drawn out across the foundation, some even foundationless, not a hint of trouble as I cycled through the boxes.

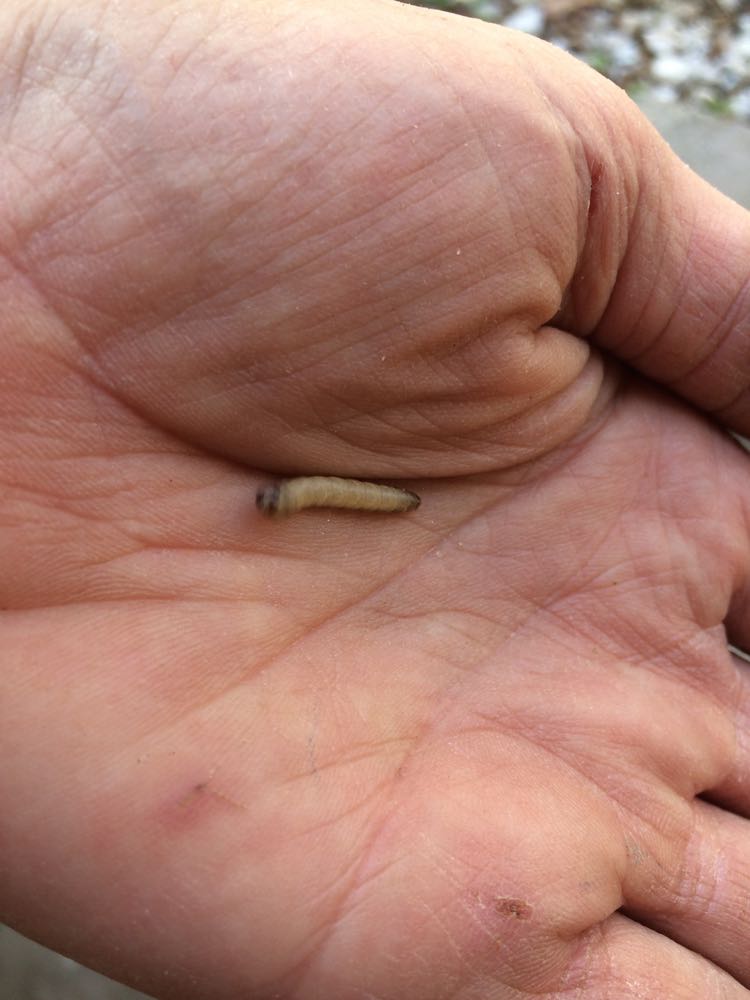
By the time I got down to the bottom box, it was easy to think I got through this honey batch without any problems until I pulled out that last honey frame. Up in the upper right hand quadrant of one side of the frame was the telltale signs of small hive beetle larvae, and it was apparent they had had some time to enjoy the fruits of the honeybees labor before I found them.

Close up of the culprits, small hive beetle larvae in empty comb.

Close up of the culprits, small hive beetle larvae in empty comb.

Needless to say, I wrapped the frame up in plastic and stuck it in the freezer to kill off the bugs.

I tend to leave small hive beetle larvae in the freezer for a good week before pulling the frames out, washing it off before it thaws out and letting the bees rob out the honey and clean out the comb.

That is one of the many benefits of having bees, they are meticulous housekeepers. If I have a honey spill of any kind, or leftover honey in a container, I take it outside and let the bees clean it out. They do fast work and leave it squeaky clean so that I can then easily wash it without sticking to it myself.

Now can you imagine what this, and the other frames of honey, would have looked like, and smelled like, had I stored it straight into the plastic tote?

I don't even want to think about it!

Charlotte

New Bee Syrup Feeder

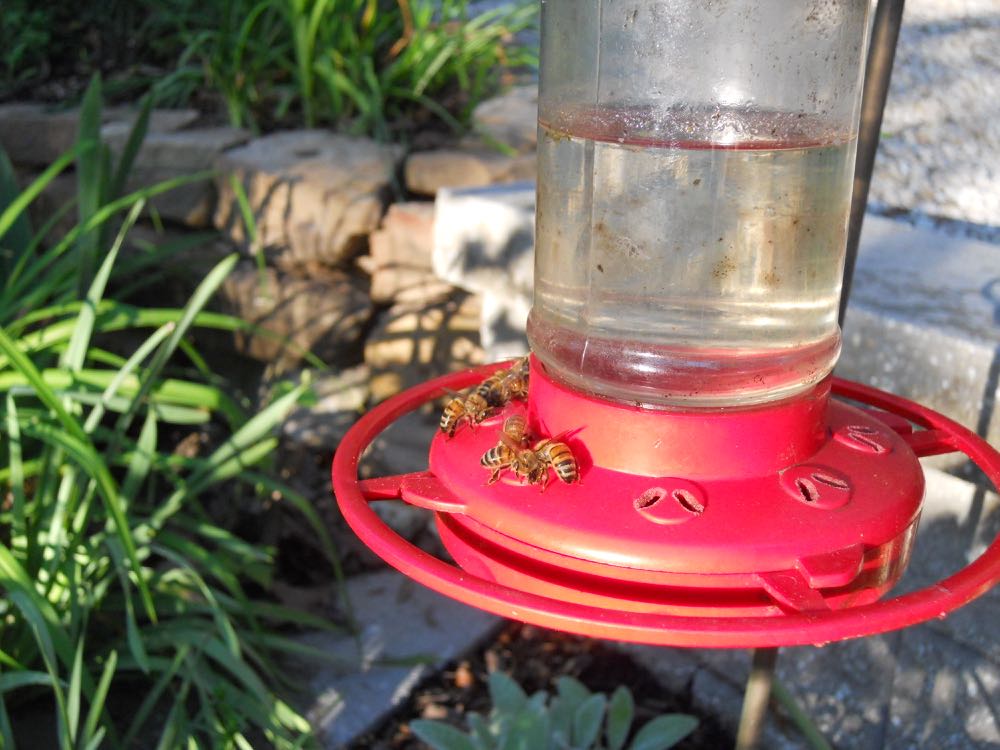
My honeybees taking a drink of hummingbird sugar water at a hummingbird feeder.

My honeybees taking a drink of hummingbird sugar water at a hummingbird feeder.

New Bee Syrup Feeder

There are only a very few situations where I recommend feeding bees sugar syrup to supplement what they may find in nature; catching swarms and when making two-frame splits come immediately to mind. There may be other special situations but, in general, I try not to feed my honeybees sugar syrup.

My bees apparently don't agree. Right after hanging my hummingbird feeders around the garden, with a 4 to 1 water/sugar syrup, one of the hummingbird feeders was getting emptied out faster than the rest. Suspecting my resident raccoon may have been sipping the sugar water, I started watching the hummingbird feeder shortly after filing in.

No big visitors to the feeder but bees were constantly around it. Even when I took the hummingbird feeder down to wash out and replenish, bees were waiting for the hummingbird feeder's return.

No other feeders have regular bee visitors like this one. It is within the flight path of one of my hives so maybe that's what makes it a popular stopping point as they head out to find pollen sources.

And the hummingbird feeder?

It has little slits designed to allow hummingbirds access but supposedly keeps everyone else out, including bees.

Maybe they should promote it as a bee syrup feeder instead!

Charlotte

Pollinator Hotels

This fancy pollinator hotel even has a roof full of low maintenance blooming succulents. 

This fancy pollinator hotel even has a roof full of low maintenance blooming succulents. 

Pollinator Hotels

You have probably seen them periodically on the internet, fancy pollinator hotels that attract a variety of native pollinators including native bees, butterflies and wasps. 

I have yet to see one with a lot of renters using it but then most native pollinators, such as native bees, are solitary. Nevertheless, I do check the simple ones I have in my garden and find even simple ones attract tenants throughout the growing season. Let's take a look at a few homemade pollinator hotels.

This first one was made by a local master gardener using an old piece of furniture, license plates and cleaning out wood pieces from his workshop.

An old piece of furniture is turned into a fancy pollinator hotel with bamboo sticks.

An old piece of furniture is turned into a fancy pollinator hotel with bamboo sticks.

The front is covered with wire to keep curious night time visitors from pulling bamboo sticks and other pieces out of the cabinet.

A wire mesh attached to the front helps to keep the pollinator hotel rooms safe for renters.

A wire mesh attached to the front helps to keep the pollinator hotel rooms safe for renters.

A collection of license plates was repurposed into a handy roof, giving the furniture piece good cover.

Old license plates were used as roof shingles on this homemade pollinator hotel.

Old license plates were used as roof shingles on this homemade pollinator hotel.

If this is too ambitious of a project, here is a simpler use of a license plate pollinator hotel, a circular piece of wood with a license plate roof cover.

A simpler pollinator hotel was made out of this license plate-covered piece of wood.

A simpler pollinator hotel was made out of this license plate-covered piece of wood.

I also like this mason bee house made by a colleague several years ago as a Christmas gift. The simple design can be made in a shorter version with a roof covered in a license plate if you have extra ones.

This one will get covered in a climbing red rose in another month or so.

A colleague made me this mason bee house as a Christmas present.

A colleague made me this mason bee house as a Christmas present.

And even simpler, this little boxy pollinator hotel features bamboo pieces with a small center circle and a wooden roof.

My roof separated last winter so I just put a shim in the space, then painted it. Didn't want to go into extensive renovations or I might miss out on the main pollinating rental season!

Another simple pollinator house from bamboo sticks hanging from a tree in my garden.

Another simple pollinator house from bamboo sticks hanging from a tree in my garden.

If you don't want to make a pollinator house, you can find a number of them available at home and garden centers. They are a wonderful way to welcome native pollinators to your garden!

Charlotte

Sandy Bird Bath

Sandy bird bath gives my bees a safe place to land near one of my bird feeders.

Sandy bird bath gives my bees a safe place to land near one of my bird feeders.

Sandy Bird Bath

Over the years, I have experimented with a variety of bird bath additions to give my honeybees a safe place to land while they get a drink of water. Honeybees need water for a variety of reasons, from hydration to take water back to the hive to use in food production and to ventilate the hive.

From twigs and leaves to rocks and statuaries, my bird baths have gone from simple bowls holding water to virtual sandy beaches - literally.

The latest experiment is this bird bath at the front of my house lined with sand. I keep it saturated with water so bees can easily get moisture without having to walk into the deep end on the other side of the rocks. 

The bird bath is a little too close to the bird feeder. Sunflower seed hulls end up dotting the sandy edge but it doesn't seem to bother the bees.

One of my honeybees that lived through winter at the edge of the bird bath.

One of my honeybees that lived through winter at the edge of the bird bath.

One of the questions I researched last year was how far should the water source be located. According to Larry Connors, the water source should be no farther than half a mile from the hive. This bird bath is about halfway between my two bee gardens, maybe 200 feet from the closest apiaries.

Rocks in the bird bath help give honeybees a safe landing spot.

Rocks in the bird bath help give honeybees a safe landing spot.

Besides sticks, I also add larger rocks to my bird baths to give bees a safe place to land. If I have to choose between large and small rocks, I prefer smaller rocks so bees can still easily reach water but still be safe from falling in.

Sand also gives honeybees a safe place to land to take up moisture.

Sand also gives honeybees a safe place to land to take up moisture.

That's why the sand works well, it gives bees a safe place to land while giving them easy and safe access to moisture.

Charlotte

Canning Lid Disk Entrance

Two homemade swarm traps that both could use the metal disk entrance disks.

Two homemade swarm traps that both could use the metal disk entrance disks.

Canning Lid Disk Entrance

These are homemade bee swarm traps, the deeper ones honeybee colonies like. The one on the right has the metal disk entrance that is attached with a screw and allows the entrance to be closed while still allowing for ventilation.

I either never have those around when I need them or order extras and then can't find them when I am ready to use them. So I was very intrigued when one of our very handy guys came up with this nifty alternative, using the inner cover of canning jars to make these disk entrances.

Now this is very exciting for several reasons. I am not handy with woodworking but I do have canning jars. I can relatively safely manage a drill bit and who doesn't like to be able to say "I made this myself."

Here is the canning lid close up with the drilled holes.

Here is the canning lid close up with the drilled holes.

Looking at the canning lid closer, the design is simple enough: a larger hole, a collection of tinier holes,  and a tiny hole in the center.

Helps to have a wooden guide to get the larger hole the right size.

Here is a demo of how the holes are drilled using a wooden block guide.

Here is a demo of how the holes are drilled using a wooden block guide.

I also like the little screw on the left to keep the canning lid from moving during the drilling process.

Note the little screw on the left holding the canning lid in place for safety.

Note the little screw on the left holding the canning lid in place for safety.

Considering how expensive these can be to order all by themselves, and how easily available canning lids are, this is a great option for when one needs a metal disk entrance.

And I will never, ever complain again that I have too many inner canning lids again!

Charlotte

Minimize Small Hive Beetles

Joining my bee buddy David, left, at a first spring hive inspection.

Joining my bee buddy David, left, at a first spring hive inspection.

Minimize Small Hive Beetles

We have had a mild winter this past year, which means another bad year combating small hive beetles. 

Last year, the little black beetles devastated many hives, including strong ones, in the matter of a couple of weeks. Originally from sub-sahara Africa, the ladybug-size black bugs can lay up to 2,000 eggs a day in dark hive corners. If left undisturbed, the larvae will quickly slime the comb, honey and even the bees, eventually chasing bee colonies out of the hive.

There is a definite rotten smell to a colony infested with small hive beetle larvae.

What is worse, most beekeepers first dealing with this pest will scrape the larvae into the ground, where the worms will pulpate and grow into more small hive beetles. The beetles will fly up to 7 miles, infesting other nearby colonies.

As beekeepers start their spring inspections, it's important that they take a plastic container with a lid with them where they can scrape the bottom of the hive, sight unseen. The frass at the bottom of the hive will contain left over wax where  small hive beetle larvae will hatch. To try to control the beetle population, scrape that out of the hive and burn it.

Frass and debris off the bottom board was scooped into a plastic bag, not poured onto ground.

Frass and debris off the bottom board was scooped into a plastic bag, not poured onto ground.

Look at the photo above, can you see the small hive beetle larvae in the frass?

Initially, many beekeepers were telling me small hive beetles would die over winter. Inspecting colonies that died, we found that the beetles were wintering over inside the colony clusters and, in some cases, surviving where the bees had died.

Small hive beetles have been wintering over inside the clustering bees.

Small hive beetles have been wintering over inside the clustering bees.

So in addition to killing the small hive beetle bugs, beekeepers need to remove the actual larvae, often found in the bottom of frames and boxes.

Here is what one looks like:

Kill the black beetles, then look for the larvae growing in frass and hive nooks and crannies.

Kill the black beetles, then look for the larvae growing in frass and hive nooks and crannies.

In addition to killing the black beetles, and removing the larvae, make sure to use traps with lures to try to keep small hive beetle populations down and replace the lure every week or so.

Colonies also need to remain strong and packed in the hives to make sure there are few uncovered frames where small hive beetles can hide.

What are you doing to manage for small hive beetles?

Charlotte

Bee Plate Find

Sweet find at a local Goodwill store, this little bright blue plate with a bee on it.

Sweet find at a local Goodwill store, this little bright blue plate with a bee on it.

Bee Plate Find

I was literally taking refuge in browsing when I came across this little find at one of our local thrift stores. 

The day had not gone as expected. I was trying to sort through the twists and turns without jumping to conclusions with only partial information and yet feeling like the developments were not headed in a good direction when I saw bright blue. 

As I approached the blue, I also spotted the little purple flower at the bottom, and then the hand-painted bee towards the top. The whole landscape appeared to be something a child would have drawn.

It's not easy to find bee items, let alone charming ones like this one. It was enough to distract me for the moment from the swirling information going around in my head; I concentrated on the plate and what drew me to it.  I liked the bright color, the whimsical bee, the simple flower. A friend who is also a beekeeper immediately came to mind and I wondered if she would like this for Christmas. Then I saw the motto at the top.

One of my favorite mantras is that life is all about choices; it's not so much what happens to us but what we do about it that counts. I had just reminded another friend of this recently; it was time I took my own advice. No, I thought, this is going home with me.  I had just the spot for the plate over the daily calendar in my kitchen, a good reminder to start my day not only being grateful but choosing to "bee happy."

Waiting in line to pay for the plate, I turned it over to see how much it would cost and literally laughed out loud.

The back of the plate was even better, it seemed to describe the kind of day I was having!

The back of the plate was even better, it seemed to describe the kind of day I was having!

Glazed and confused. That was me that day but I was choosing to make it better. And how appropriate that I should find this reminder at the Goodwill.

Charlotte

Tying a Hive Down

Using bungee cords and ratchet straps to tie down bee hives at Bluebird Gardens.

Tying a Hive Down

Not that beekeepers have a derth of topics to discuss but if you want to start a lively conversation, ask a beekeeper how he/she ties down a hive.

When I first started beekeeping, I was told a rock was required to keep my hive lids on. I love rocks, I collect them on walks but having a big chunk of the earth sitting on top of my beautiful white topped hives doesn't quite fit with my hive aesthetic.

I did use rocks for my first years, then graduated to red bricks I had in my garden. The bricks were ok but I still wasn't too settled on the idea. Besides, I was short of red bricks and now I had a mish mash of rocks and bricks on my hives. Sheesh, that was worse.

Now I am a hobby beekeeper. I don't "run" my girls to make honey, I like having them in my garden and appreciate having a little extra honey but it wasn't my primary motivation to get bees. Which is another way of saying I do care how my hives look in my garden and I am willing to take the time to make them look nice.

Enter a non-beekeeping friend who prides himself on coming up with solutions. MacGyver has little on this man, and I appreciated his suggestions, especially about things I can't resolve to my own satisfaction.

On this particular visit, he noticed my hive rocks lined up on a wall. I told him I was trying to make them blend in better into my garden landscape. A few days later, he gave me a ratchet strap and suggested that may be the solution.

Do you know what I'm talking about? These are heavy duty straps with a belt-like contraption that helps tighten the straps. My challenge is how to make the straps loose, especially without breaking off my nails to pull back the little levers.

After several training sessions, my friend politely suggested this may not work. By then I had invested in several red ratchet straps and winter was just around the corner. No more time to play around with matching rock sizes or coming up with an alternative for holding down my hive lids.

During the same shopping spree, I had also purchased yellow and black bungee cords in various sizes. Yes, I bought them for the color to tie the black insulation I wrap around my hives to give them some wind protection.

I now hook ratchet strap ends to my bungee cords to hold my hive lids on.

I now hook ratchet strap ends to my bungee cords to hold my hive lids on.

Oh, I still use the ratchet straps, only instead of forcing the belt side I hook the ends onto the bunge cords. Easy to take off and put back on, and no further damage to my nails.

MacGyver would be proud.

Charlotte

Honey and More Gift Packages

My honey gift boxes this year included honey samples, bee ornament and sweat head band.

My honey gift boxes this year included honey samples, bee ornament and sweat head band.

Gift-Giving Honey

When I started harvesting honey, I had the hardest time finding containers I liked to showcase my honeybees hard work. It takes a bee a lifetime to make 1/12th of a teaspoon of honey. Ever since I read that, even a tiny spill seems like a waste.

In the years since, when I have had very little honey to share, it's even more of a challenge to figure out how to bottle what little I do have. This year, I decided to make gift boxes combining several items:

I found 2 ounce plastic containers I liked so I could easily ship and share different honey colors and flavors of the season with friends, family and fellow beekeepers. The trick was to have labels that shared good information.

Two ounce honey jars harvested from different times of the year demonstrate different flavors.

Two ounce honey jars harvested from different times of the year demonstrate different flavors.

In addition to the honey samples, I made them what we laughingly-called our "bee ninja" sweat bands, terry cloth head bands made to custom fit different head sizes designed to keep sweat out of their eyes as they inspect hives. I asked them to give me individual head measurements this spring without telling them why.

These will come in quite handy next spring and summer.

Bee sweat band made out of terry cloth with elastic band on the back.

Bee sweat band made out of terry cloth with elastic band on the back.

The little embroidered bee matches the beekeeping club mascot. He was a bit of a challenge to find but I lucked out at a craft store during a business trip this fall. The head bands would have been fine without him.

Handblown in Missouri honeybee ornament.

Handblown in Missouri honeybee ornament.

The little hand-blown bee ornaments were made by a local glass blower for our bee club honey contest prizes.

My beekeeping friends, who can be quite competitive, expressed disappointment that their honey didn't win in the earlier honey competition but only I knew I had some extra ornaments set aside. 

Simple things each by themselves but packaged together, I thought they turned into very nice little thank you gift packages.

Charlotte


Beekeeper Tree Topper

Charming flying angel chasing a bee is my Christmas tree topper this year.

Charming flying angel chasing a bee is my Christmas tree topper this year.

Beekeeper Tree Topper

Ever since I can remember, our Christmas trees have had an angel as a tree topper. 

Our first ones were beautiful wax-faced angels my mother hand carried from her days living in Germany, followed by hand-carved ones from Brazil. Somewhere along the way, those angels made way for a handmade fabric angel a neighbor made my Mom. Then for many years, there was a lighted angel bright enough to substitute for an aviation homing beacon my kids liked a lot.

This year, as I was contemplating getting an angel for the first tree I was putting up for the first time in a number of years, an angel appeared all on her own. They have a tendency to do that, don't they. It was a little ornament an office colleague had given me years ago as part of an office Secret Santa gift exchange shortly after I started keeping bees.

She was such a favorite, I kept her hanging from a plant in my office all year. When I retired, I combined all of the ornaments and re-discovered her as I reopened the boxes. She's perfect, a little gardening angel in a wide brimmed hat chasing a wayward bee. That would be my kind of angel!

Charlotte


Handmade Lightbulb Bee Ornament

This old lightbulb was painted and recycled as a bee ornament gift.

This old lightbulb was painted and recycled as a bee ornament gift.

Handmade Lightbulb Bee Ornament

A work colleague and beekeeping student gave me this handmade recycled lightbulb bee ornament last year. He said his wife made it and I thought it was so clever to recycle an old lightbulb yellow and black, then add pipe cleaners to the head for antenna.

The wings are wire, and the other charming feature is the wire stinger added to the back. 

Wire glued to the back gives this lightbulb bee a little stinger.

Wire glued to the back gives this lightbulb bee a little stinger.

I think someone was paying attention in class!

Bees and beekeeping haven't made it into the marketplace as favorite Christmas tree ornaments yet so nice to have a handmade one as a gift from someone who also now has the beekeeping bug.

We warned you in class, beekeeping can be addictive!

Charlotte

Halloween Honeybee

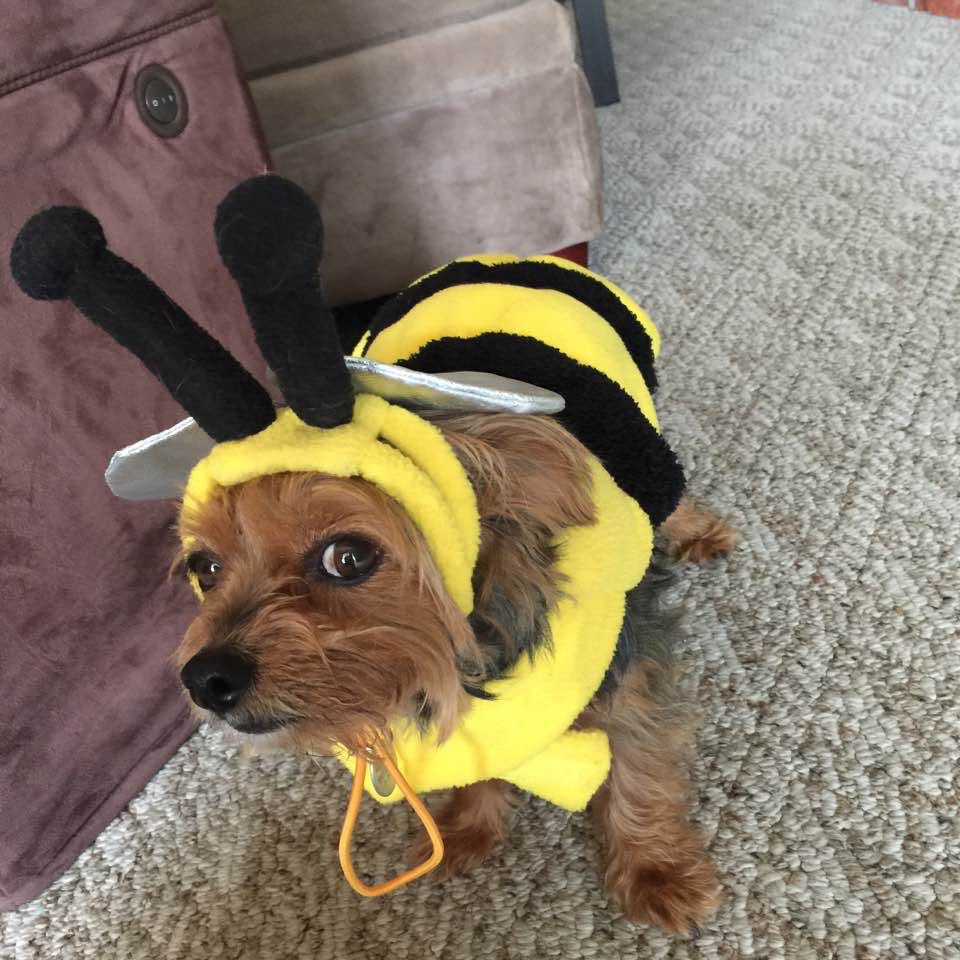
My friend Mary Frances dog Freddie in his bee costume Halloween 2016. Bzzzz!

My friend Mary Frances dog Freddie in his bee costume Halloween 2016. Bzzzz!

Halloween Honeybee

For the first time in years, I noticed there are a lot more bee Halloween costumes available. It's easy to assume a beekeeper already has a ready costume with his bee suit but finding a good bee costume can be a challenge.

Many costumes confuse honeybees with bumblebees and one I saw on the shelf called a wasp a bee. They are cousins but definitely different species.

So it was delight that I spotted this bee costume on my friend Mary France's dog Freddie. Freddie is cute as button as it is but this bee costume was just, well - wait for it - the bee's knees!

This costume would be easy to make if you could find the right fabric, maybe something in fleece. The head piece would be more of a challenge but let's face it, Freddie makes it worth it!

Charlotte

How to Safely Provide Bees Water

My honeybees get a little sugar water treat in a bird bath shaped like a flower.

My honeybees get a little sugar water treat in a bird bath shaped like a flower.

How to Safely Provide Bees Water

I can't say for sure that the shape of the bird bath makes a difference but my bees seem to think it does. I have a number of bird baths throughout my one acre, hillside garden. The one the bees seem to visit the most is the one shaped like a two-foot flower.

I use this favorite watering spot to give them a regular source of water. The bird bath is lined with rocks and sticks to give bees a safe place to land and I don't worry about keeping it immaculate. The bees seem to prefer water with a little age to it.

It also works well when I have a little sugar water treat when I empty jars feeding my beginning colonies. August is a hard time for bees. Bee colony numbers are at their highest and food supplies, especially when temperatures are over 95F, are almost non-existent. Plants stop producing pollen when temperatures rise over that thresh hold for several days in a row.

To make sure my beginning colonies get a good start, I feed them 3:1 sugar water to encourage them to draw wax comb. When I clean their sugar water jars, any extra gets poured into the nearby flower-shaped bird bath. Bird bath rocks and sticks work well for sugar water, too.

My honeybees enjoying a little sugar water drink safely in a flower-shaped birdbath in my garden.

My honeybees enjoying a little sugar water drink safely in a flower-shaped birdbath in my garden.

Adding rocks and sticks has been a practice I have used since I started beekeeping. The rocks give them a safe landing spot and the sticks ensure they have a safe place to climb should they fall in.

It also makes it possible for more bees to access the liquid without piling on top of each other. I love having bees in my garden, they are a lot of fun to watch.

Concrete frog in my flower-shaped birdbath seems to be enjoying the company!

Concrete frog in my flower-shaped birdbath seems to be enjoying the company!

The little concrete frog provides bees another safe landing spot. I didn't think about when I added him to the bird bath, I just liked the way he looked there!

How do you provide your bees water in your garden?

Charlotte

Adding Small Hive Beetle Lure Traps

This is one of the small hive beetle traps available. I like these because they are easily reusable.

This is one of the small hive beetle traps available. I like these because they are easily reusable.

Adding Small Hive Beetle Traps

2016 has been a bad year for beekeepers trying to manage the sub-Sahara Africa-based small hive beetles in mid-Missouri. Record hot temperatures may have contributed to their increased numbers but it was heart-breaking to hear beekeeping students loosing their bee colonies to these little black bug larvae in only a matter of days, in some cases.

The principle with the traps is to install small hive beetle traps filled with a lure to entice the beetles away from hive dark corners, where they like to congregate. The traps are not a guarantee of pest prevention, they are one of a series of strategies beekeepers can use to try to control the small hive beetle populations.

You can buy a pre-made lure, use mineral oil or make your own. Here is the recipe I use but note it takes a couple of weeks to ferment so plan on keeping mineral oil on hand to use in the interim:

Small Hive Beetle Trap Lure Recipe (also called David's Cocktail)

½ cup apple cider vinegar
¼ cup sugar
1 cup water
1 ripe banana peel cut up finely

Directions: Combine all ingredients and allow to ferment for about 2 weeks. Fill center well of the trap with lure. Fill wells on either side with an oil - mineral oil, vegetable oil, something that will drown small hive beetles when they fall in. Replace when full or every few days. With hotter weather, traps should be checked and refreshed more frequently.
 

A reusable small hive beetle trap filled with a homemade small hive beetle lure in center well.

A reusable small hive beetle trap filled with a homemade small hive beetle lure in center well.

Reusable small hive beetle trap wells on either side of center filled 1/3 with mineral oil.

Reusable small hive beetle trap wells on either side of center filled 1/3 with mineral oil.

Once you have the small hive beetle traps filled, install two traps per hive body at a diagonal to each other in the farthest corner of the hive. You are going to reverse the installation as you go up hive bodies so doesn't matter which corner you start with, just remember one corner so you can install the rest correctly.

install two small hive beetle traps per hive body. install them at diagonally to each other off the farthest frames in hive corners.

install two small hive beetle traps per hive body. install them at diagonally to each other off the farthest frames in hive corners.

As you add a second hive body, if appropriate, reverse the corners where you placed the small hive beetle traps.

On your second hive body, install the two small hive beetle traps in the opposite corners of the first hive bottom, again at a diagonal.

On your second hive body, install the two small hive beetle traps in the opposite corners of the first hive bottom, again at a diagonal.

Same thing as you add a third hive body and so forth. Your third hive body should match where your small hive beetle lure traps are in the brood (bottom) box.

Same thing with the third box, place the small hive beetle traps in the opposite corners to the second box. This should look like the first hive box.

Same thing with the third box, place the small hive beetle traps in the opposite corners to the second box. This should look like the first hive box.

Once installed, bees may add propolis around, and sometimes inside, the small hive beetle lure traps. Just remove the traps, clean out the propolis, refill and re-install.

Clean and refill the traps away from the hive or the lure, including mineral oil, will get dripped onto the comb.

Once installed, bees may fill propolis around the small hive beetle traps. The traps should be regularly-refilled with fresh lure.

Once installed, bees may fill propolis around the small hive beetle traps. The traps should be regularly-refilled with fresh lure.

The lure needs to be replaced every week or so, depending on how hot the weather is. The hotter the temperatures the less effective the lure is so it should be replaced every few days.

These plastic condiment bottles make quick work of refilling small hive beetle traps.

These plastic condiment bottles make quick work of refilling small hive beetle traps.

If you use plastic condiment bottles or a turkey baster, you can easily pour out the old bug-filled lure and add fresh lure and not spill much. I refill mine in the garage, then take them to the hives to install. If you try to do this at the hives, it can get messy. Remember you will have your leather gloves on, that can make handling these traps cumbersome.

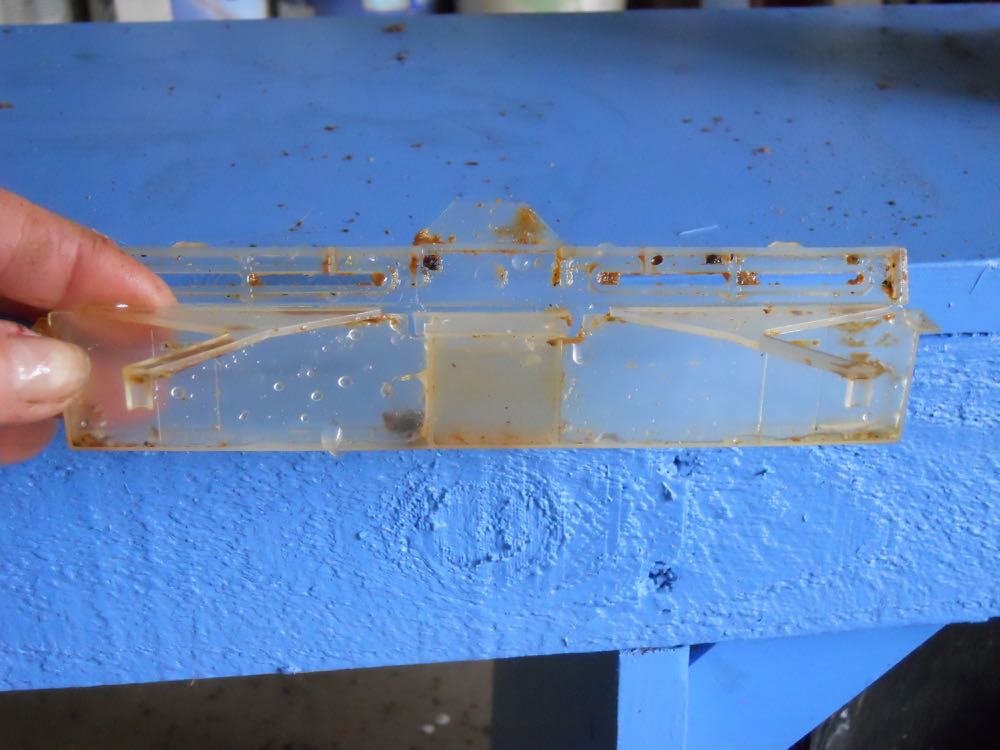
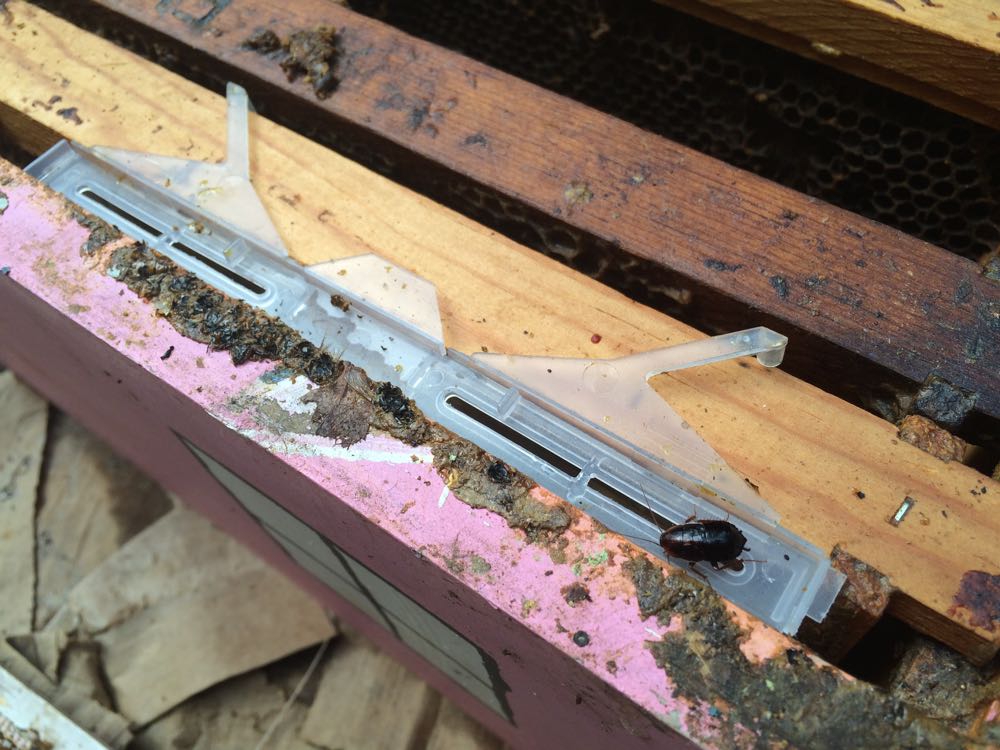
Here's a full trap ready to be cleaned out and refilled:

This is a small hive beetle trap ready to be cleaned out and re-filled. cockroaches and other bugs - not bees - may also get caught in the traps.

This is a small hive beetle trap ready to be cleaned out and re-filled. cockroaches and other bugs - not bees - may also get caught in the traps.

If you can't find these traps and need to quickly do something to manage small hive beetle populations, try Swiffer dust rags rolled up into hive corners in the same configuration as the traps.

Don't use dryer sheets, those will capture as many bees as they do small hive beetles.

Small hive beetles can take over strong hives in a week if they are not carefully checked and patrolled. Using small hive beetle lure traps is one way you can try to keep them in check.

Do you use small hive beetle lure traps in your hives?

Charlotte

How to Capture Bees Loose in a Sorority House

Bees at the edge of a sorority house deck.

How to Capture Bees Loose in a Sorority House

Missouri S&T students are moving back to campus. In the process, bees are also moving, although not by their own choice. In the case of this bee call, honeybees had moved into a sorority house room and the tenant was "very afraid" of bees.

After looking at the room and making sure the door stayed closed, we went outside to see where the bees might be coming in. At the bottom of the corner of the deck, on the right side, a few bees were going in and out of a small hole.

The house manager did not want to remove the many layers of siding to get to the bees so that hole will be closed up at dusk, trapping bees inside.

Back inside the room, there were about 45 bees flying around the bedroom closed off from a study room by a door. I individually caught the bees in a tissue, then moved them to a plastic cup before grabbing the next. one. Most bees were gravitating to the windows so we checked each one, then went back to double check. During the process, we discussed how bees set up their homes, why they fly towards light and how they sting.

Once bedroom was cleared, I tackled the bees in the study area. Bees in that windowless area were attracted to the overhead light.

With all those bees cleared out, the room tenant came back in and the mystery of how they were getting in was solved. She said she had left the door above the deck open this morning so bees had not found another entrance.

Captured honeybees wait for me to put on my bee suit before I released them in my garden.

Captured honeybees wait for me to put on my bee suit before I released them in my garden.

Bees are now released in my bee garden; I put on my bee suit first before I released them. Good thing because they were none too happy to be here and let me know what they thought by dive-bombing me.

They won't make it but at least the sorority room was cleared for the new tenant, she's here for one more semester.

Welcome back, Missouri S&T students!

Charlotte

Check Honey Labels

This jar of honey claims to be US honey but look at the four different honey sources.
This jar of honey claims to be US honey but look at the four different honey sources.

Honey labelling is a bit confusing, especially whether the honey was made and bottled in the US.

I recently came across a jar of honey that said it was "US Grade A Fancy" but then listed honey sources as US, Canada, Argentina and Ukraine.

When buying honey, make sure the label clearly states where the honey was bottled and only select honeys from the US. Many countries sell alternatives to honey that don't contain any pollen, a sure sign of real honey.

Better yet, only buy honey from local beekeepers, that way you know it's real honey.

Charlotte

How to Make Sugar Patties

A bowl, a spoon and a container to put the mix in is all you need to make sugar patties.

A bowl, a spoon and a container to put the mix in is all you need to make sugar patties.

It is very easy to make homemade sugar patties, especially the way my beekeeping friend David showed me.

David uses aluminum pie tins so I will start with those quantities. For one pie tin, either 8" or 9," pour 2 cups sugar into a bowl. Spray with 40 squirts out of a spray water bottle. Mix with a wooden spoon or your hands. Pack into the pie tin. Allow a couple of days to dry.

When using clear suet containers, you will need 1 cup sugar and 20 squirts of water from a spray bottle. Mix. Pack into a suet container. Allow to dry.

David said sometimes he adds a drop of lemongrass, food grade essential oil to each patty. I skipped that step in making mine.

The first sugar patties I made I dried in an oven warmed to 100F, then turned off. Not sure that is necessary unless conditions are very humid.

Sugar patties drying

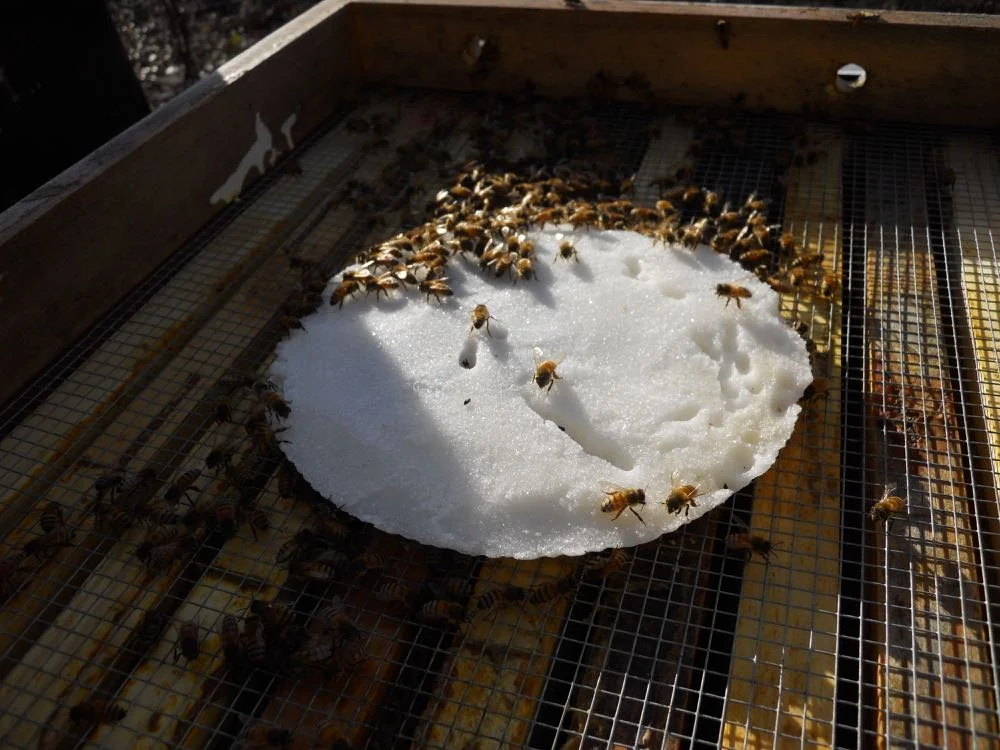
To feed, place in a top feeding shim under the inner cover to supplement winter honey supplies.

One of my bee colonies eating one of David's homemade sugar patties in a pie tin.

One of my bee colonies eating one of David's homemade sugar patties in a pie tin.

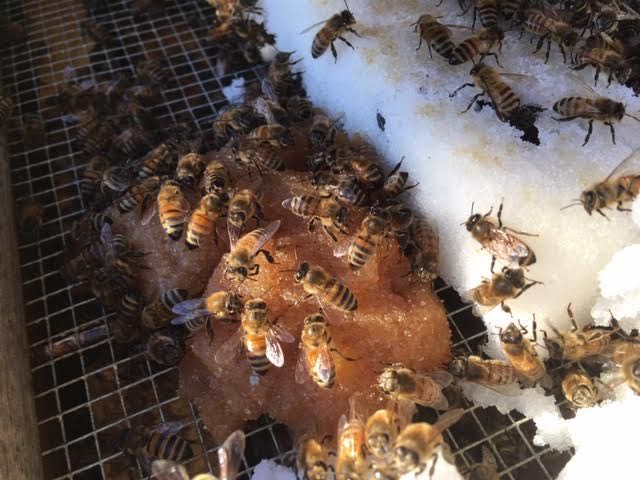
Once bees have a pollen supply from the garden they will stop taking the sugar. In the meantime, glad to be able to easily give my bees supplemental food so they don't starve at the end of winter.

Charlotte