Adding More Native Bees

Dwarf peach trees are in bloom, time to add native bees to my garden. (Photo by Charlotte Ekker Wiggins)

Dwarf peach trees are in bloom, time to add native bees to my garden. (Photo by Charlotte Ekker Wiggins)

Adding Native Bees

For years I have had several native bee houses, with residents, in my Missouri limestone hillside garden. This year I decided to add more, focusing on adding diversity to my pollinating population. My additions include blue orchard bees, which like to pollinate early crops and fruit trees; leaf cutter bees, which focus on summer crops and Osmia Texana, which are the early pollinators.

Frankly last year I was a little perplexed why I didn’t find leaf cutter bees in my garden, those are reportedly excellent summer crop pollinators. They use the cut up leaves to line their nests. Maybe I just didn’t see them, they are relatively small.

I purchased these from Mason Bees for Sale, carefully reading all of their care information so that I didn’t have them for too long sitting in my refrigerator. I also tracked the weather so I wasn’t putting them outside when the temperature was too cold for them.

This is how they arrived in a clear plastic bag:

Native bees ready to add to native bee houses. (Photo by Charlotte Ekker Wiggins)

Native bees ready to add to native bee houses. (Photo by Charlotte Ekker Wiggins)

These bamboo tubes have spent a few days in my refrigerator as I waited to see buds forming on my dwarf fruit trees.

Once those were starting, I took the tubes out of the refrigerator and added them to my existing native bee houses. I carefully cut the bamboo rod hopefully on the back end of the tube, then added at least one of each of the three native bees to each of my native bee houses.

See the new bees on the right ready to hatch? (Photo by Charlotte Ekker Wiggins)

See the new bees on the right ready to hatch? (Photo by Charlotte Ekker Wiggins)

The instructions said it can take 1-10 days for the bees to emerge. I put them out when the forecast was calling for evening temperatures above freezing.

Off to my berry patch where I slipped a couple of bamboo pieces into the new native bee house now facing the berry patch.

Another native bee house faces my berry patch. (Photo by Charlotte Ekker Wiggins)

Another native bee house faces my berry patch. (Photo by Charlotte Ekker Wiggins)

I have had honeybees in my garden for 9 years and also found native bees among the flowers so I am hoping these will also co-exist.

We need both honeybees and native bees to continue pollinating plants for the health of the plants and to continue to provide us with nutritious, varied and healthy foods.

If you have a bee lover on your gift list, consider this beekeeper’s custom subscription box, it would make a lovely Mother’s Day gift!

Charlotte

The Bees Knees Sangria

Meramec Vineyards, St.James, used my honey for one of their unique sangria drinks. (Photo by Meramec Vineyards)

Meramec Vineyards, St.James, used my honey for one of their unique sangria drinks. (Photo by Meramec Vineyards)

The Bees Knees Sangria

Over the holidays, I gave Michelle and Joe Boulware of Meramec Vineyards some honey for Christmas. The next thing I knew, they were using the honey for one of their signature sangria drinks, appropriately enough called “The Bees Knees.”

Ever since the Boulwares’ purchased the winery about a year ago, they have been featuring fun events, special supper club dinners and interesting drinks like “the Bees Knees Sangria.”

I don’t drink alcohol often but I may be tempted to give The Bees Knees Sangria a try, I do love lemon, too!

Charlotte

Bees on Rainy Spring Day

One of my honeybee colonies at the top of their hive on a rainy Missouri day. (Photo by Charlotte Ekker Wiggins)

One of my honeybee colonies at the top of their hive on a rainy Missouri day. (Photo by Charlotte Ekker Wiggins)

Bees on Rainy Spring Day

It’s a gray, rainy day in spring in Missouri, and I am having a hard time not sloshing through my garden paths to see what is growing.

Every day is different in spring with new plants popping up daily and returning residents making their presence known. Frogs are back in ponds, goldfinches are turning bright yellow again and even young butterflies have been keeping my honeybees company in bee bars, bird baths where I add twigs, leaves and rocks to give these pollinators a safe place to land.

One of my bee bars with sticks, rocks and leaves to provide water. (Photo by Charlotte Ekker Wiggins)

One of my bee bars with sticks, rocks and leaves to provide water. (Photo by Charlotte Ekker Wiggins)

This particular Saturday, I wanted to see what my honeybees were doing so I peeked under one of my larger colonies. There they were, quietly generating heat over where I suspect queen bee has been laying eggs so they are keeping the nursery warm, too.

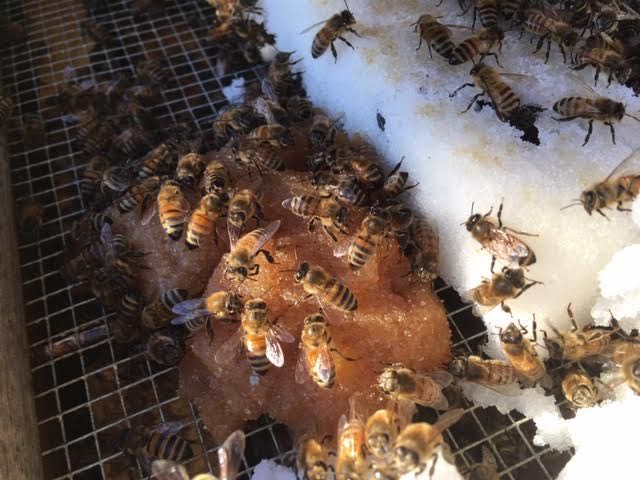
The sugar cakes on the left are left over from winter supplemental feeding, a back up food source in case they ran out of honey during bad weather. Sugar provides bees with carbohydrates and flight fuel. The sugar also helps absorb moisture, which kills bees faster than cold.

I had also placed sugar cakes with pollen substitute on the right, now totally consumed. Pollen is baby food, what bees feed their newly-hatched bees.

It’s now a race between bees, beekeeper and the weather on how soon I can get inside the hive to make sure mama bee has enough room to lay and all is well with the colony.

Charlotte

Level Bee Hives

Winter heaving and thawing has started to tilt this hive in my bee garden. (Photo by Charlotte Ekker Wiggins)

Winter heaving and thawing has started to tilt this hive in my bee garden. (Photo by Charlotte Ekker Wiggins)

Level Hives

This is both a recommendation and a suggestion as you prepare to do your first spring inspections: make sure your hive stands are relatively level, which means the hive can have a small tilt at the front to keep water out but it should not look like the leaning tower of Pisa.

Winter heaving and thawing of soil changes the foundation of your hives if you have them on soil as I do. Even if you have concrete matts often found under air conditioning/heating systems, soil will move and cause listing.

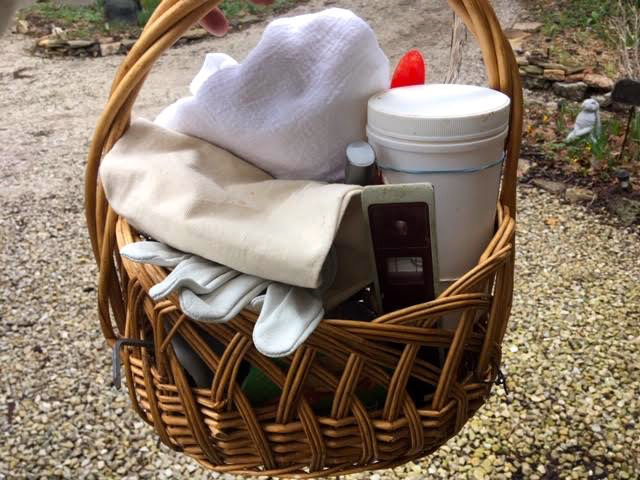
That’s why in my basic beekeeping basket, the one I take with me out to my hives, I have a tiny level.

A small level is a good tool to include in your beekeeping basket. (Photo by Charlotte Ekker Wiggins)

A small level is a good tool to include in your beekeeping basket. (Photo by Charlotte Ekker Wiggins)

This level starts the growing season in my beekeeping basket so that I re-level my hives when doing their first inspection of the season. The level then moves to my gardening bucket so I can check bird baths, which also start leaning. The level comes in handy to also settle in small rock walls, wood walls and benches.

Now those of you who know me may be saying to yourself, that poor hive is also listing because Charlotte did the leveling. I’ve been known to get distracted by something in the garden and not necessarily remembered where I last left off so when I get back to it I assume I leveled it…

In this case, my bee buddy David and my gardening buddy Tom BOTH worked on getting this purple hive level last fall. You will note they added bricks at the bottom of the concrete blocks to try to better settle the blocks and shims under the hive. And the spot still moved over winter!

I do keep an eye on these listing hives and, if I find them structurally unsound when I gently push on them, I will do something then, such as add temporary shims. It will have to be redone after the soil thaws so it is most definitely a temporary fix.

This hive looks like it has legs that are leaning!! (Photo by Charlotte Ekker Wiggins)

This hive looks like it has legs that are leaning!! (Photo by Charlotte Ekker Wiggins)

That’s what I did to this listing yellow hive earlier this past winter. If you will note, the bottom of the concrete blocks don’t have bricks under the blocks. When I first set up the concrete blocks, the left side was a smidge higher than the right side so that may explain why the right stack of blocks is learning more.

I plan to move this hive down to a lower level where I will be once again checking the blocks before I place the hive.

One more beekeeping tip when it comes to hive placement. If you have annual plants nearby that you pull at the end of the growing season, that soil movement can impact your hive levels. I leave those plants through winter since birds may eat seeds and then clean them up in spring by pulling them out and composting.

There is a connection between those plants and your hives, the nectar your bees collect comes from those flowers, which is why my honey samples include using the containers later to save seeds to plant more flowers.

Weather is warming this week so guess what I will be doing when I start my spring hive inspections!

Charlotte

Baked Sugar Pollen Cakes?

This is what happens when you turn on the oven after forgetting you have sugar cakes drying in oven. (Photo by Charlotte Ekker Wiggins)

This is what happens when you turn on the oven after forgetting you have sugar cakes drying in oven. (Photo by Charlotte Ekker Wiggins)

Baked Sugar Pollen Cakes?

Not deliberately but I did end up with baked sugar pollen cakes after I turned on the oven.

After making the sugar cakes in re-used fruit clam shells, I put them in a cold oven to set. It can take up to 4 days for the sugar cakes, or this time of year sugar and pollen substitute cakes, to get hard enough that I can pop them out of the clam shells.

The fruit clam shells make a good mold for the sugar cakes. They have openings on the bottom so the sugar will dry. Once dry, I can store two “bricks” of sugar cakes per clam shell.

Here is how they look when drying:

Finished sugar and pollen cakes in clam shells drying. (Photo by Charlotte Ekker Wiggins)

Finished sugar and pollen cakes in clam shells drying. (Photo by Charlotte Ekker Wiggins)

Once dry, I can store them until I need them in my bee hives.

All sugar and sugar with pollen sugar cakes in one of my bee hives. (Photo by Charlotte Ekker Wiggins)

All sugar and sugar with pollen sugar cakes in one of my bee hives. (Photo by Charlotte Ekker Wiggins)

Since I like to bake in winter, I really should have some reminder on the oven door that the oven is occupied. But I didn’t.

The first sign of trouble was when I started to smell something burning. A quick check of the oven and I remembered what was in there so consider this a public service announcement. Don’t put your sugar cakes in the oven to dry without leaving yourself a reminder they are in there.

Maybe I should use these Honeybee Kitchen Towels draped over the oven handle to remind me!

Charlotte

Hard Winter Supplemental Sugar Cakes

One of my colonies at the top of the hive on sugar cakes with protein substitute. (Photo by Charlotte Ekker Wiggins)

One of my colonies at the top of the hive on sugar cakes with protein substitute. (Photo by Charlotte Ekker Wiggins)

Hard Winter Supplemental Sugar Cakes

Another winter storm is in the forecast so I took the opportunity early afternoon February 19, 2019 to check “under the hive hoods” to see how my bees were doing. Three colonies were almost out of the supplemental sugar/pollen cakes I had in the top “eke,” a 1.5 inch feeding shim I keep at the top of my hives most of the year.

The eke gives my colonies a top exit in case their bottom entrance gets closed by ice and snow.

All colonies were on the supplemental sugar cakes with pollen substitute I added mid-January. In the photo, those supplemental sugar and pollen substitute cakes are the golden ones on the right.

You can see the remains of the original sugar cakes I provided for supplemental feeding in the fall. The shells of the remaining sugar cakes are hard and dry, which is a good sign that the hive has been dry so far this winter. When there is moisture in the hive, the sugar cakes work as wicks to remove the moisture. Most bees don’t die of winter cold, they die from being wet.

The hard sugar is difficult for the bees to access so I sprayed the dry sugar with water from a spray bottle so the bees can move that supplemental sugar if they need it. Bees won’t move sugar while they are in a cluster but as soon as there is a warm, sunny day over 45F they will be flying out of the hive and re-arranging food stores.

Although I am enjoying the break from garden work, I do miss seeing my bees flying so this was the next best thing.

Charlotte

Unexpected Hive Visitor

Can you see the visitor, top of the photo? (Photo by Charlotte Ekker Wiggins)

Can you see the visitor, top of the photo? (Photo by Charlotte Ekker Wiggins)

Unexpected Hive Visitor

When talking to beekeepers, one of the subjects that comes up is who has been visiting the hives. They’re not talking about people; they have tangible signs of visitors in the ground and hive and are trying to determine what creature may have been close by.

For every one of the four seasons, there seems to be at least one apiary visitor.

In summer, the signs of bear are clear. Bears usually tear up hives to steal a frame of honey and take the frame away from the bees.

Other regular visitors are skunks. Those native Missouri mammals will leave claw marks at the hive entrance where they have tried to grab some bees.

Raccoons will also periodically stop by and try to remove lids. I watched a raccoon one day remove an entrance reducer as well.

One summer I was excited to see a tomato red bird in my garden. A friend told me later those were tanangers, also called “bee eaters” because they like to snack on bees.

In winter, possums may find refuge under hives where the heat from the cluster moves through the screened bottom board and leaves the spot under the hive nice and warm.

In spring and summer, lizards take up watch under my hives as garbage disposals. They don’t bother the live bees.

I was ticking through the list of possible hive visitors one night when I spotted some movement near my hives. I don’t have them stacked next to each other any more but this particular evening, the hive neighborhood had an unusual visitor. When I looked at the photos, I identified an armadillo in the apiary.

These non-native visitors have been migrating north from Texas. They like grubs and often dig through soil looking for food.

Here’s a better photo. Most definitely an armadillo! (Photo by Charlotte Ekker Wiggins)

Here’s a better photo. Most definitely an armadillo! (Photo by Charlotte Ekker Wiggins)

They are migratory, in other words they will move on from a location.

What unexpected visitors have you seen in your apiary?

Charlotte

Getting Ready for Beekeeping Class

2019 beek class prep 1.jpg

Getting Ready for Beekeeping Class

It’s that time of year again when some beekeepers teach. No, that’s not quite right, beekeepers coach, bees teach.

Because spring and summer can be such a busy time for beekeepers, winter is a good time to concentrate on things one couldn’t do earlier - read, paint hives, take classes. Or provide advice and instruction to others with less experience.

Coaching first time beekeepers can be fun. The enthusiasm and interest in the subject carries many through the trials and tribulations of learning how to successfully keep bees. One experienced beekeeper told me once more bees die at the hands of beginning beekeepers than any other time. I don’t think that is true but beginning beekeepers can be hard on colonies.

Knowing what was ahead of everyone, I decided to add a little treat to the stack of paper. Can you guess what it was?

It took bees visiting 250,000 flowers to make this 2 oz honey jar. (Photo by Charlotte Ekker Wiggins)

It took bees visiting 250,000 flowers to make this 2 oz honey jar. (Photo by Charlotte Ekker Wiggins)

Not that everyone keeps bees to get honey but it’s fun to share flower nectar as a treat.

This is a 2 ounce jar of honey. Do you know how many flowers it takes for bees to make that 2 ounces?

How about 250,000 flowers from plants, shrubs and trees.

Yes, that’s a lot of flowers!

Charlotte

Portable Field Microscope

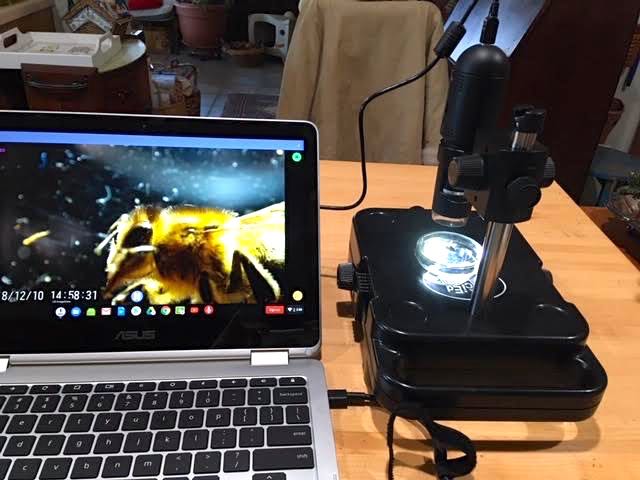
Getting a closeup of one of my honeybees on Lunchbox Viewer. (Photo by Charlotte Ekker Wiggins)

Getting a closeup of one of my honeybees on Lunchbox Viewer. (Photo by Charlotte Ekker Wiggins)

Portable Field Microscope for Beekeeping

For as long as I have been a beekeeper - going on 9 years now - I have heard the lament that there is no way to take a microscope out into the apiary for disease diagnosis and related identification confirmation.

One year, one of the larger Missouri beekeeping clubs had an array of microscopes borrowed from a local university. Each one had an attending student and, although we could peer through the eye piece, no one could actually touch the $5,000+ pieces of equipment.

At another beekeeping club meeting, there was a sample of a variety of computer software available but none had the clarity and ease of use, and all required hauling a computer of some sort along with it. There were a few there were phone apps but those were in testing mode with less than impressive quality.

When my brother and his son mentioned they were working to develop a quality, portable and affordable microscope for schools to use in science classes, that got my attention and I asked if I could see one. This Christmas I got my wish. My brother gave me one of his portable lunchbox-size microscopes to take out for a spin. Actually it was the first Lunchbox Viewer from their latest manufactured batch, even autographed by the designer on the back side of the viewer. Bet my bees will be impressed.

My brother and nephew gave me one demo on how to set it up and break it down while my niece nearby was also discussing her fashion choices. That was deliberate, my nephew said, they wanted to see how easy it was to remember how to assemble and take apart to store. My niece talking about her clothes at the same time, though, was accidental. I think.

Assembly was easy; I was a little worried about putting it all away but the body of the lunchbox has an easy guide on what pieces go where.

Match Lunchbox Viewer pieces to the easy guide inside. (Photo by Charlotte Ekker Wiggins)

Match Lunchbox Viewer pieces to the easy guide inside. (Photo by Charlotte Ekker Wiggins)

My gift included a padded box from a big box store so that a Google Chrome book easily travels with the “Lunchbox Viewer.” Here is the Lunchbox Viewer tucked into the bottom of the padded box.

The Lunchbox Viewer packed inside a protective case. (Photo by Charlotte Ekker Wiggins)

The Lunchbox Viewer packed inside a protective case. (Photo by Charlotte Ekker Wiggins)

The Lunchbox Viewer basically has six pieces to assemble. They are easy to fit into the right spots and a bit intuitive.

Setting up dead bees for a close up. (Photo by Charlotte Ekker Wiggins)

Setting up dead bees for a close up. (Photo by Charlotte Ekker Wiggins)

I braved cold weather to scoop a few dead bees out of nearby hives. One bee was less than impressed getting dragged out of her hive so I had to escort that one back outside. Yes, I remembered which hive she was in!

One little bee got scooped up with the dead ones. (Photo by Charlotte Ekker Wiggins)

One little bee got scooped up with the dead ones. (Photo by Charlotte Ekker Wiggins)

Once working, the Lunchbox Viewer can also be hooked up to a laptop to take and save photos. The Google Chrome book was nicely thin and easily fits into the protective case.

I have been looking at bees for almost a decade and I have never seen my bees in such detail. I was surprised to see how “fuzzy” these older winter bees still are, and how their legs have arrow-shapes where they collect flower pollen. Their wings were also surprising, I could see their “veins” through the gossamer-like appendages.

The first close up of one of my dead bees before I cleaned the plastic dish it was in. (Photo by Charlotte Ekker Wiggins)

The first close up of one of my dead bees before I cleaned the plastic dish it was in. (Photo by Charlotte Ekker Wiggins)

I did say this was portable and easy to carry so here is the Lunchbox Viewer, packed up and ready to take outside.

With an attached laptop, the whole set up will nicely fit on top of a hive lid. Yes, I set it up outside for a few minutes to make sure it all fit.

And here it is, being quite portable.

The Lunchbox Viewer is designed to be portable, (Photo by Charlotte Ekker Wiggins)

The Lunchbox Viewer is designed to be portable, (Photo by Charlotte Ekker Wiggins)

The Lunchbox Viewer was developed to support InSciEdOut, a STEM-based curriculum my brother also helped to design to get students and teachers interested in science and math. According to their website, “InSciEdOut is a collaborative partnership committed to rebuilding pre-K through grade 12 science education. Our mission is to engage students and empower teachers through research-based, experiential classroom learning.”

Proceeds from the Lunchbox Viewer support the program, currently in use in Chicago, Rochester, Mn and all of India.

Looking at one of my bees through the Lunchbox Viewer. (Photo by Charlotte Ekker Wiggins)

Looking at one of my bees through the Lunchbox Viewer. (Photo by Charlotte Ekker Wiggins)

It’s almost standard practice these days for endorsements to include some kind of financial reward but I am not getting anything for this endorsement, I truly believe this is a great tool for bee disease diagnosis and beekeepers education. I also think it’s a great tool for science classrooms everywhere but that’s another story.

Retail for the Lunchbox Viewer is $299 per unit. The cost does not include the Google Chrome book, which was purchased separately during a Black Friday sale for $29 nor the padded carrier, purchased at a big box hardware store.

I am looking forward to seeing pollen grains up close next!

Charlotte

Innovative Mouse Guard

This innovative mouse guard was homemade. (Photo by Charlotte Ekker Wiggins)

This innovative mouse guard was homemade. (Photo by Charlotte Ekker Wiggins)

Innovative Mouse Guard

One of the unexpected discoveries of beekeeping is that many beekeepers are engineers at heart. Although there are many beekeeping suppliers, the most interesting developments often come from clever beekeepers solving one or another issue with a hive.

This is one of those products one of our regular beekeepers shared at our last bee club meeting. It is a hive entrance reducer improved with wire to keep mice out of the hive in winter. The larger wire allows bees to go in and out but keeps the hive safe from mice.

A small notched wood piece reduces a hive entrance. (Photo by Charlotte Ekker Wiggins)

A small notched wood piece reduces a hive entrance. (Photo by Charlotte Ekker Wiggins)

Now this sounds simple but beekeepers have to make sure what side of the entrance the mice are on. Last summer, a beekeeping friend kept finding his entrance reducer sideways in front of his hive. Thinking some creature was trying to get in, he would replace the entrance reducer to protect the colony from possible invaders.

After a couple more times finding the entrance reducer moved, my friend opened the hive only to find a family of 8 mice had settled INSIDE the hive and were moving the entrance reducer so they could get out.

When I looked closer at the entrance reducer alterations, it was a relatively easy concept that can be made to existing entrance reducers. The trick is making the cut so that one doesn’t go all the way through the wood entrance reducer. Ask me how I know that can be challenging to a new woodworker.

The wire is the size often used in top hive feeders, wide enough for bees to move through.

Jesse Pogue, Salem, Mo., third from left, sharing his innovative mouse guard at a Rolla Bee Club meeting. (Photo by Charlotte Ekker Wiggins)

Jesse Pogue, Salem, Mo., third from left, sharing his innovative mouse guard at a Rolla Bee Club meeting. (Photo by Charlotte Ekker Wiggins)

Seeing these ideas is one of the main reasons why beekeepers should attend monthly meetings and share their innovations. It will make us all better beekeepers!

Charlotte

Rolla Bee Club 2019 Basic Beekeeping Classes

RBC 2018 Class Tom Miller.jpg

Rolla Bee Club 2019 Basic Beekeeping Classes

It’s almost that time of year again, when would-be beekeepers take the plunge and take their first class to learn how to keep bees. Most Missouri beekeeping clubs hold their beginning classes in the winter because bees are tucked in their hives and beekeepers have more time to spend teaching.

I have been teaching basic beekeeping classes for five years and thoroughly enjoy introducing new potential beekeepers to the art, and science, of keeping honeybees.

Registration is now open for three Rolla Bee Club basic beekeeping classes. The non-profit, educational organization will have two basic beekeeping classes January 26, 2019 and February 23, 2019 at Brownwood Estates Clubhouse from 9 a.m. to 4 p.m. The third class is for second year beekeepers and will be held March 23, 2019 from 9 a.m. to 4 p.m. also at Brownwood Estates Clubhouse.

Cost is $50 which includes class materials, a catered lunch and refreshments. Class size is limited.  To register, send your name, email and phone number to rollabees@gmail.com and a check to David Draker, 1951 Monterey Drive, Rolla, Mo. 65401. Deadline to pre-register for the January 26 class is Friday, January 4, 2019.

Gift certificates are also available. Order class gift certificates by December 15, 2018 by emailing rollabees@gmail.com and by calling (573) 578-0561.

The basic beekeeping classes will include basic bee behavior and biology; beekeeping equipment needs and costs; how to properly use beekeeping equipment, how to set up bee hives and how to get bee colonies through their first winter.

The second year class will focus on basic beekeeping skills to be a successful beekeeper.

All instructors are active beekeepers with more than 25 years of beekeeping between them.

Rolla Bee Club is a Missouri 501© 3 non-profit educational organization supporting beekeeping class students and area beekeepers. Rolla Bee Club meets the 4th Sunday of the month from 2-4 p.m. at Brownwood Estates Clubhouse, 1341 California, Rolla, Mo. Social hour starts at 1 p.m. Everyone is welcome!

Charlotte

Thank You Postal Service

My card and honey jar in my mailbox for my considerate mail carrier. (Photo by Charlotte Ekker Wiggins)

My card and honey jar in my mailbox for my considerate mail carrier. (Photo by Charlotte Ekker Wiggins)

Thank You Postal Service!

I don’t mean to brag but I have one of the nicest and considerate mail carriers. Not only does she bring me my mail when she is making a package delivery but she stops by first thing in the morning when she knows the package has plants in it. That way the plants don’t spend all day in her car before she makes it to my neighborhood.

I was so touched with her latest consideration that I decided to treat her to something special. Adding a little card of explanation, I snuck a jar of fresh honey from my hives in the mailbox, hoping the card leaning on the jar would stay upright long enough for her to see it.

Sure enough, the following day I found a little thank you note from her scribbled on a torn piece of yellow paper. And she said she loves honey!

The thank you note from my mail carrier after I left her a honey jar. (Photo by Charlotte Ekker Wiggins)

The thank you note from my mail carrier after I left her a honey jar. (Photo by Charlotte Ekker Wiggins)

Sharing the honey from my bees is one of my favorite things to do!

Charlotte

Wily Webs

This garden spider has caught herself quite a number of honeybees close to my front porch.

This garden spider has caught herself quite a number of honeybees close to my front porch.

Bees in Spider Web

Fall is settling into mid-Missouri, which means an increase in the number of garden spiders around my hillside garden. Of all of the garden seasons, this is the one that most threatens my honeybees. One enterprising spider set up her web over a water feature that attracts my honeybees. In one day, she caught eight bees in her web, bundled food she leaves once her babies hatch.

A friend of mine likes to say everyone has to eat but I see no reason to make my bees such easy targets. I like spiders but I would rather they not make a meal out of so many of my bees. In the past I have seen spiders with only a couple of bugs caught in their webs so this one is making the most of her easy opportunity.

Taking a broom, I carefully moved the spider to a corner of my property and cleared her very sticky, strong web. I moved a few of the dead ones with her so she didn't have to kill any more.

I forget all of the claims but I do recall a spider web is one of the strongest structures built in nature.

Once caught in the spider web, the spider spins a jacket around each bee to secure them.

Once caught in the spider web, the spider spins a jacket around each bee to secure them.

If you look closely, the spider has carefully wrapped each bee in, and with, her web.

I managed to release one of the bees still alive. It was a bit of a trick to pull the sticky web off the bee body but I did see the bee finally fly off.

Missouri is home to more than 300 kinds of spiders, 22 of those unique species. Spiders, ticks, mites and scorpions are all arachnids, not insects.

They have 8 walking legs with tiny retractable claws on each foot. Most have 6-8 eyes on top of their heads, which provides them with great depth perception and the equivalent of 3-D vision. Spider bodies are two-piece and hairy. Some sit in their webs waiting for meals to walk by, others actively chase prey.

Only two are considered dangerous to humans: the brown recluse and the female “black widow,” both very small spiders. The rest are harmless. I did get a spider bite when one was in a shoe a couple of months ago. Besides some redness and itching, it was similar to a bee sting; no harm done. Well, except to the spider. I did inadvertently squish it.

As I look for webs in my garden, I find some that are just strands of silk while others remind me of delicate lace. Garden spiders build beautiful lacy-like webs with a center zigzag patterns. Crab and orbweaver spiders build large web circles. Orbweavers have large stomachs and hairs on their legs and tummy. They also sit in their webs with their heads up.

Another common spider in my garden is smaller and dark with white markings, most likely micrathena. They range in color from pale yellow to white with dabs of brown or black and grow to be 8-10 mm in size. I find them hanging with the top of their bodies hanging downward.

There are also several tiny spiders with what appears to be trap lines stretched across bushes. I am still working on identifying the smaller ones.

As a fan since childhood of E.B. White’s “Charlotte’s Web,” spiders hold a special place in my garden but they are also important biological control agents. They feed on common insect pests including aphids, caterpillars, leap hoppers, mosquitos and flies. It was estimated arachnids consume 400-800 million metric tons of prey each year and more than 90% are invertebrates. According to Lund University, “spiders eat more insects than people eat meat and fish.

The garden spider working on her last catch before I moved her to another garden location.

The garden spider working on her last catch before I moved her to another garden location.

This time of year black and yellow garden spiders are prominent, at least in my garden. The females are up to four times larger than the males and much brighter in color. These are the ones I keep re-locating. Their main diet consists of insects like flies and bees. Haven’t tried them on curds and whey. 

Charlotte

Catching Swarms

A little worker bee takes a break from flying around scouting new bee home locations. (Photo by Tom Miller)

A little worker bee takes a break from flying around scouting new bee home locations. (Photo by Tom Miller)

Catching Swarms

Every spring, beekeepers you may know will get just a little giddy at the mention of “swarms.” While members of the general public conjure up some low budget Hollywood disaster movie at even the thought, to a beekeeper a swarm is everything from “free bees” to an invitation to an adventure.

First, honeybees swarming are not something to be feared. In most cases, bees in a swarm are at their most docile. Full of honey before they left their last home, these bees are waiting for scout bees to locate new possible houses while they literally hang out – on your fence, the side of a house, maybe a nearby tree.  The scouts return to the bunch of bees, describe the potential home and the bees “vote” on which one they like best. Once the consensus is reached, the swarm will leave their spot and follow the scout bee to their chosen location.

Swarms have a very short life span, 3 to 5 days so if you see a swarm, please don’t spray it or swat at it, visit rollabeeclub.com for a list of area beekeepers who will come out to catch the swarm.

To go after swarms, beekeepers are like first responders, vehicles packed with extra bee suits, possible helpful equipment like a ladder and empty hives in various sizes.

If one is lucky, a beekeeper can entice a colony into a new home with ample space, hive frames already with places for the queen to lay and maybe a whiff of honey. To say that swarms are “free bees,” however, dismisses the work associated with catching a swarm.

To be successful in keeping a swarm in a hive, a beekeeper has to feed the colony sugar syrup, simulating nectar bees find in flowers in nature. In more than half the swarms caught, the queen also has to be replaced since most queens are old and past their prime in terms of laying eggs.

Even with good care, the national figures indicate 40% of all caught swarms make it through their first winter so in spite of all of the work, there still is a good chance the bees won’t make it.

Some beekeepers are also unaware that varroa mites travel on bees and small hive beetles travel with bee swarms, continuing to cohabitate with bees once they settle in their new accommodations. Stressed bees generate a pheromone that triggers the ladybug-size, black sub-Sahara African small hive beetles to go on an egg-laying spree, each female bug laying up to 1,200 eggs a day. At that rate, these imported bugs can easily take over a bee colony in less than a week.

Muslin kitchen towels are very helpful in swarm-catching, they help show what bees are doing. (Photo by Charlotte Ekker Wiggins)

Muslin kitchen towels are very helpful in swarm-catching, they help show what bees are doing. (Photo by Charlotte Ekker Wiggins)

In spite of the challenges, catching swarms are a lot of fun, especially those from one’s own hives. The secret is to find the queen and get her inside the new possible home. Once the queen is inside, the rest of the bees will quickly follow her inside.  All the beekeeper has to do at that point is wait until dark, close up the hive and move it to its final destination.

Charlotte


Bottom Hive Debris

This is the debris I found at the bottom of one of my honeybee hives this spring.

This is the debris I found at the bottom of one of my honeybee hives this spring.

Bottom Hive Debris

So what do you think, debris from a dead or still live honeybee colony?

During one of our few sunny and warm days yet this spring 2018, I opened one of my hives for their first spring checkup and this is what I found on the screened bottom board.

Good news, the bees were flying in and out of the top feeding shim but no bees were using the bottom front entrance through the entrance reducer.

When I removed the bottom board, it struck me how as beekeepers we become amateur sleuths, looking at clues to determine what may have happened inside a hive. This 10-frame bottom deep was originally a brood box or nursery so take a closer look at what was on the bottom screen, what do you see?

A closer look at the hive debris shows undeveloped white drone bodies.

A closer look at the hive debris shows undeveloped white drone bodies.

I also see little pieces of the sugar cakes I made and installed early winter to give the colony an extra food source in case they ran out of honey. Those can be re-used.

The undeveloped white drone bodies suggest the worker bees may have been removing the drones, a desirable hygienic behavior. The question is why, did the drones have varroa mites inside their cells? That is where varroa like to hide to reproduce while the drone larvae is developing.

What else do you see in this bottom of the hive debris, this is the debris on the right.

What else do you see in this bottom of the hive debris, this is the debris on the right.

This is when a magnifying glass, or even a field microscope, would come in handy. If this were a dead colony, I would also be looking at the frames to see what symptoms I could see on the wax. What I would look for are the signs that look like little specks of sugar in the cells which are varroa excrement.

Another key to look for if this were a dead colony is to look at the wings to see if any are deformed, another sign of varroa mite presence.

Luckily this colony is doing quite well, they had established themselves in the top boxes and left this bottom box empty, typical of later winter/early spring spacing in a hive. That's why some recommend "switching boxes" as long as you're not breaking up the brood when you do it.

With this colony, I was moving them into smaller 8-frame boxes so I carefully kept all of the frames in the same order and moved the brood into the new bottom box hoping spring would arrive any time.

Spring?? Any time would be great, we're ready!

Charlotte

New Beekeeping Jacket

Doesn't this sound like instructions for how to wash clothing for bees??

Doesn't this sound like instructions for how to wash clothing for bees??

New Beekeeping Jacket

After 8 years of wearing and wearing out my first cotton beekeeping jacket, I found another similar one and finally have it in hand. 

What I liked about the first one is that it had a front zipper; the hood, or veil, was round, giving me a better field of vision, and it was cotton so it was relatively lightweight.

My first ever beekeeping suit has definitely seen better days and is ready to be replaced.

My first ever beekeeping suit has definitely seen better days and is ready to be replaced.

I have other beekeeping jackets but after trial and error, I like my beekeeping jackets to have the following:

Round hood with veil for better view

Front zipper as opposed to a pull over

Cotton, and I will add

Veil that is easy to re-attach.

There are a number of other features beekeeping jackets can include but these three are the basics that work for me, especially the front zipper. I have one of the heavier, supposedly cooler beekeeping jackets but it's hard to pull it on, then harder to take it off without completely disrobing.

Although the idea of a cooler jacket sounds nice, the basic cotton beekeeping jackets work just fine because they are lightweight. The supposedly mesh, lightweight beekeeping jackets are much heavier so I'm not sure that they are better in the long run, I seem to be hotter when I wear that beekeeping jacket than my normal cotton canvas one.

If you are just starting out in beekeeping, it's tempting to get the full bee suit but you will end up with a jacket so try on both before buying. Most clubs will have beekeeping suits available for you to take them for a test walk so you can get a feel for what it is like to see the world looking through the black mesh. Don't forget to add a pair of gloves, then decide which beekeeping suit you can maneuver in best.

In terms of washing, most are best hand washed, especially the veil. The lightweight cotton canvas jackets definitely dry faster than the other ones.

Also make sure you can re-attach the veil once you take it off, my original one is hard to re-attach so I have to ask for help after I wash it. And it's not a good idea to try to get it attached once you're a visitor in an apiary, get it attached before.

Here's my new beekeeping jacket, ready to be inaugurated this spring:

new beekeeping suit.jpg

This is from Pidgeon Mountain Trading.com. PM9980 $49.95 not including shipping.

One sweet little feature, there are bees issued with every beekeeping jacket:

The back of my new beekeeping suit has a sweet design including its own little bees.

The back of my new beekeeping suit has a sweet design including its own little bees.

We like to joke in our bee club about not trusting anyone wearing brand new beekeeping equipment so I'd better get to getting this one to work!

Charlotte


Heart Pillow Gift

This heart pillow was a gift from one of our January 2018 beginning beekeeper students.

This heart pillow was a gift from one of our January 2018 beginning beekeeper students.

Heart Pillow Gift

During our January 24, 2018 beginning beekeeping class, one of the students snuck this little heart pillow under my arm and said thank you for all you've done to set up the class.

Turns out Jesse made the pillows for all of the class instructors out of fabrics from a favorite skirt of her mothers, which makes the re-purposing sweet. The button is from one of her mom's coats and Jesse said the button reminded her of the shape of bees.

I was so busy with the class I didn't notice the second, smaller heart until I got home and pulled the pillow out of the bag.

True to form, my little yellow cat Shirley Honey was batting the pillow around within minutes of finding it on the sofa so I now have to find a safe place to keep it unless its to become the latest cat play toy.

Thanks, Jesse, good luck with your bees!

Charlotte

Beginning Beekeeping Class February 24, 2018

One of the new photo displays at our January 24, 2018 beginning beekeeping class.

One of the new photo displays at our January 24, 2018 beginning beekeeping class.

Beginning Beekeeping Class Coming Up February 24, 2018

We are getting ready for our second beginning beekeeping class in Rolla, Missouri Saturday, February 24, 2018 this year. While my dining room is still a disaster area with partially assembled diaries, to the delight of one of my cats, it's fun to take a time out to remember what it was like to be someone just getting started.

There are a lot of different classes around, some 3 hours long promising to teach everything you need to know to be a beekeeper to special weekend long courses for one technique. Our day long course 9 a.m. to 4 p.m. is designed to give students what we wished we had known when we started, just the basics on what to buy as start up equipment and how to manage honeybees through the first winter. We even joke that they can't call themselves beekeepers until they successfully pull a colony through a winter.

And to make sure they are successful, my bee buddy David and I also started the Rolla Bee Club, which meets the fourth Sunday of the month at the same location as the classes, 1341 California. The monthly club meetings review what is happening with the colonies, what tasks are coming up, addresses issues and hopefully provides a support network for area beekeepers to be successful. The website also lists upcoming meeting dates, references and other helpful information.

No two years of managing honeybees is exactly the same. Having opportunities to share information, compare notes and keep track of what is going on with other beekeepers is very important to be successful. And who wants to miss out on all of the stories!

Not quite sure what story Kelly S. Bracken is sharing with a new student but it looks like a good one!

Not quite sure what story Kelly S. Bracken is sharing with a new student but it looks like a good one!

When David and I first started beekeeping, and yes the dinosaurs I'm sure where still around somewhere - we had to scrounge for information so we give our students a better experience with a basic beekeeping book we have sourced ourselves; a custom beekeeping diary to emphasize the importance of record-keeping with check lists to guide them in key decisions to set up their apiary; a catered lunch from St. James Marketplace Cafe; a natural events calendar to monitor when food sources will be blooming; several catalogs and a tube of special oatmeal "Stop the Sting" to handle their first bee stings. Cost for class registration is $50 to cover the class materials.

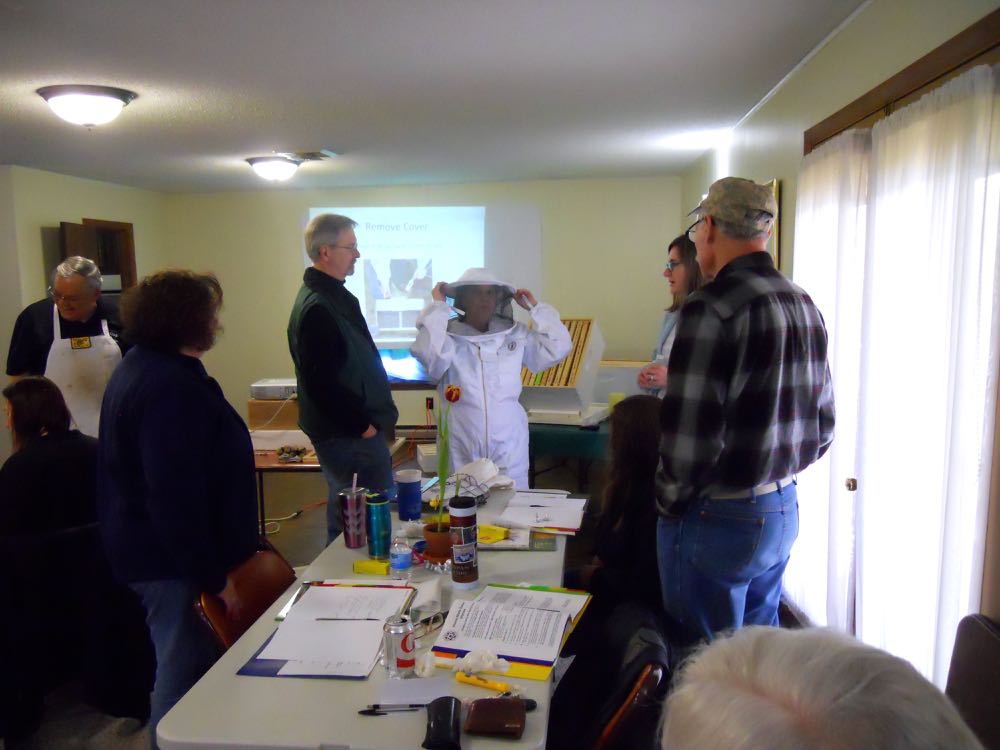
We also bring in equipment then can try out including beekeeping suits.

Beginning beekeeping class students get to try on beekeeping suits to get the right size.

Beginning beekeeping class students get to try on beekeeping suits to get the right size.

Now one of David's pet peeves is having to undo what people pick up watching you tube videos so we have a simple rule about that. We say don't trust anyone wearing a brand new - suit, gloves or aprons.

Let's see, yes David's apron most definitely qualifies, not too clean!

Let's see, yes David's apron most definitely qualifies, not too clean!

In addition to being able to try out equipment and discuss the pros and cons of various types of equipments, beginning beekeepers at the end of the day have the option of visiting a nearby working apiary so if you are taking this class, plan on bringing, or borrowing, a bee suit.

To pre-register, contact David at (573) 578-0561 and email rollabees at gmail.com.

"We think that being exposed to bees is an important part of the educational experience," David said. Since this is his apiary, I tend to agree. I also love to see the faces of people who want to keep bees having the first honeybee land on their heavily gloved hand. Priceless!

Charlotte


Honey Bees in Wood Pile

This is the wood pile where the caller said he had seen bees flying.

This is the wood pile where the caller said he had seen bees flying.

Honey Bees in Wood Pile

It's cold and possibly snowing again so here is one of the bee rescues David Draker and I completed a couple of years ago. The caller worked at a St. James Industrial Park business and noticed bees flying around one of their scrap wood piles, telling us a swarm had moved in.

When we arrived, it looked relatively quiet but then we were also there early morning, before the sun was up for very long, and before anything had warmed up, including us.

As we checked out the wood pile, some little faces popped up.

Honey bees appear in between wood pieces in the scrap wood pile as the sun hits them.

Honey bees appear in between wood pieces in the scrap wood pile as the sun hits them.

And then a few more. On closer inspection, we found the honey bees had not just moved in, they had been busy for awhile.

Beautiful yellow comb had been built on the wooden pieces piled into the wood pile.

Beautiful yellow comb had been built on the wooden pieces piled into the wood pile.

Basically we were looking at a makeshift top bar hive where the top bars were 1x4 inches wide.

Time to suit up!

The president of the company where we were removing the bees suits up to lend a hand.

The president of the company where we were removing the bees suits up to lend a hand.

Luckily this wax comb was hanging down nicely, one piece of comb per wood slat, so it was relatively easy to carefully remove. I draped the kitchen towels over the remaining bees and comb while we carefully removed each wood slat at a time. Much better than using smoke, especially when the honey bees are as calm as these were.

Honey bees built their wax comb on the bottom of the wood in the pile.

Honey bees built their wax comb on the bottom of the wood in the pile.

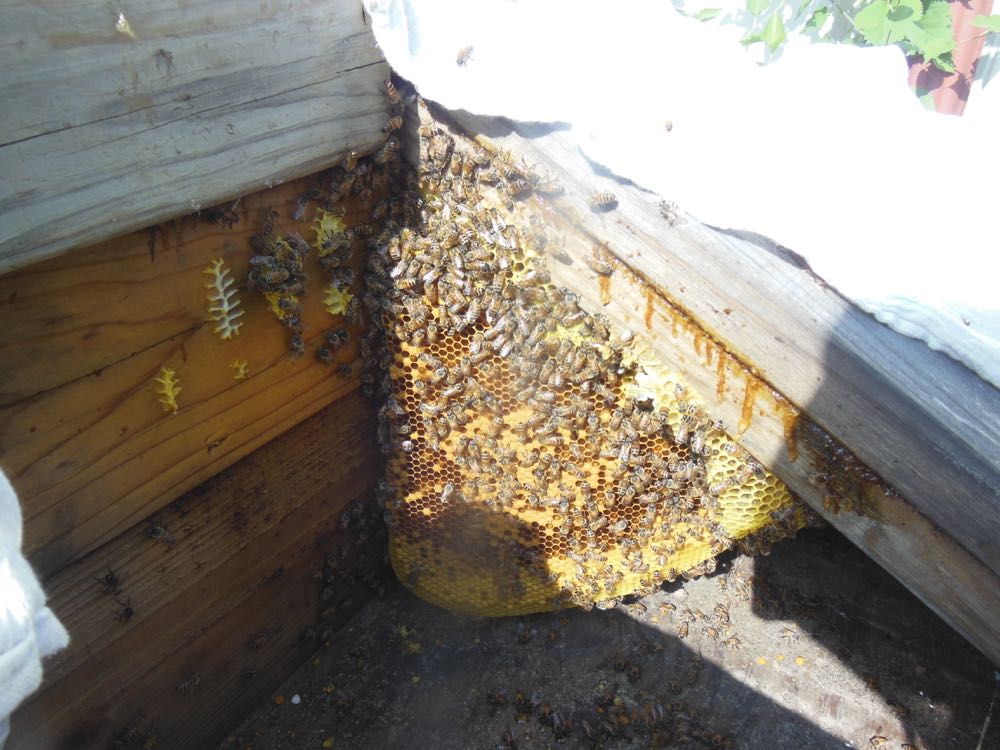
Here's another piece of comb hanging from the last piece of wood we removed from the wood pile.

Bees in wood pile corner comb.jpg

The piece of comb gets fitted into an empty frame and secured with rubber bands. I settled the wax comb into the frames when I wasn't taking photos, in case you were wondering. :)

A makeshift work station nearby is used to cut comb into frames and held with rubber bands.

A makeshift work station nearby is used to cut comb into frames and held with rubber bands.

Once all of the wax comb was removed, and the queen caged, we brought in a hive into the wood pile to leave for a couple of days so the bees would settle in before moving.

David sets an empty hive with a queen in a clip inside to attract bees to the new home.

David sets an empty hive with a queen in a clip inside to attract bees to the new home.

After a few minutes, bees start going into the hive after the queen's welcoming pheromone.

After a few minutes, bees start going into the hive after the queen's welcoming pheromone.

In the video you will see the bees moving into the hive all by themselves. They are following the queen pheromone into their new home.

We left the hive in place for a couple of days, then went back after sunset to pick it up. By going after sunset, most of the foragers were back so we had most of the colony.

We settled them in David's apiary.

The new colony settled in David's apiary on concrete blocks for a base.

The new colony settled in David's apiary on concrete blocks for a base.

David pulls out the rubber-banded frames to see if the bees are building wax to attach comb.

David pulls out the rubber-banded frames to see if the bees are building wax to attach comb.

This turned out to be much more than a swarm, it was a nicely-established, and large colony that nicely made the move.

Bees in woodpile in new home hive corner.jpg

Charlotte

Winning Bees Photo

My photo of some honey bees flying into bird feeder won a second place ribbon at state contest.

My photo of some honey bees flying into bird feeder won a second place ribbon at state contest.

Honey Bees Flying Winning Photo

This was a last-minute pick for the 2017 Missouri State Beekeepers Association photo contest. Since it was the first time the photo contest was being held, I tossed in a few of my favorite photos. Being on the Missouri State Beekeepers Association board, I do what I can to help the volunteer board members help Missouri beekeepers.

These honey bees were doing what a lot of bees do this time of year. With the queen bee starting to lay, the foragers are looking for pollen. These found some corn dust in my front bird feeder on a bright sunny day. It was a lucky shot to catch the bees all in focus flying in formation into the feeder.

There will be another photo contest during the March 2-3, 2018 Missouri State Beekeepers Association spring conference in Warrensburg. Here are the photo contest rules:

Missouri State Beekeepers Association Spring Conference March 2-3, 2018 in Warrensburg

1. Photos must depict a beekeeping theme including but not limited to bees, beekeepers, hives,
honey, brood, etc. in the photos.
2. Photos can be in color or black and white. Those that have been digitally altered beyond basic
editing and toning will not be accepted.
3. Limit 3 photos per person
4. Photos must have been taken within the last 2 years
5. Cannot re-enter the same photo used in previous (fall 2017( MSBA Photography Contest
6. Photos must be in printed form. They may be mounted, framed, or in protective plastic sleeve
7. Your name must be on the back or attached to the photo in some way
8. You are responsible for picking your photos up.
For more information, email Erin Mullins: emullins93@gmail.com.

Photos must be entered at the conference site by 11:30 a.m. Friday, March 2, 2018.

So what photos do you have to enter? Have one that will beat mine?

I'd love to see it in Warrensburg!

Charlotte